Posted in : Applications, Exchange, Microsoft, Office 365, Other By Hanessa Milaszewski Translate with Google ⟶
4 years ago
INTRODUCTION
Working majority of my time within an office setting, I am, as well as many other office workers, very aware with the procedure of booking meetings. Quickly summarized, this amounts to opening the enterprise’s chosen collaboration tool, inviting required attendees all while ensuring that there are available meeting rooms with the suitable equipment.
Believe it or not, this common practice is often set for confusion which could be one of the many reasons that a whole market for various meeting equipment exists. One of these that had their surge within their market are so called room managers, which are meant to be mounted just outside of a meeting room while often having the ability to book the desired room directly or to display its availability during the day.
Recently, I have been working with Evoko Liso Room Manager and would like to share my experience with it.
OVERVIEW
The manufacturer of Evoko Liso, Evoko, market their product as the “The next generation room manager”. Whatever you might think of the tagline, it is indeed a very capable product both from a user experience and an administrative perspective, the latter which I will detail a bit further in this blog post.

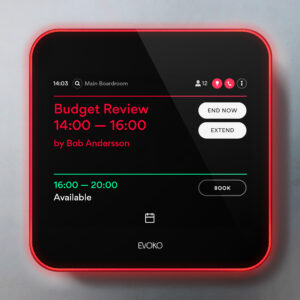
In regards to the hardware, the Evoko Liso consists of an 8 inch touch display with a proximity sensor. Around it, there is a 3-way indirect light aura used to quickly display room availability from a distance. It also has a RFID reader built-in, where RFID cards can be enrolled to achieve Authentication-like requirements in order to confirm that the room is in use for an example.
Connectivity-wise it has support for both wireless (Wi-Fi 802.11 a/b/g/n) and wired (Ethernet RJ-45). While wired, the Evoko Liso can actually be powered over Ethernet (PoE) should you not want to use the included 12V AC/DC power adapter.
While the Evoko Liso can be used fully stand-alone, it is also compatible for synchronization with the following collaboration platforms.
- Microsoft Office 365
- Microsoft Exchange 2010/2013/2016/2019
- Google G Suite
- IBM/Lotus Domino
HOW DO I DEPLOY EVOKO LISO?
The Evoko Liso is, in other words, the name of the booking device itself. To actually use its capabilities in its entirety together with existing collaboration platforms, it requires an initial installation process summarized below. Keep in mind that I will use Microsoft Office 365 along with Windows server as the example here, whereby the details within the steps can differ.
- Prepare the booking system for use with Evoko
Using Office 365 as the collaboration platform, the preparation includes configuring a service account with the appropriate Impersonation rights towards bookable resources. If the latter does not exist yet, here is the opportunity to create them and configure them in accordance to the behavior of Evoko Liso.
- Install Evoko Home on a server
In this scenario, the Evoko Liso is thought out to rely on the Evoko Home software, provided by Evoko themselves free of charge. This can be installed on its own server (Windows or Linux), with the following technical requirements.
- Windows Server 20008 R2, or later.
- A static IPv4 address, which the Evoko Liso devices will point at.
- HTTP port 3000 and HTTPS port 3002 open, or two other application ports reserved for this.
- HTTP port 80 or HTTPS port 443 used to access Office 365.
- NTP port 123 (UDP) used to access an NTP server.
- Integrate Evoko Home towards the booking system
With the previous steps carried out, it is time to connect Evoko Home to the Office 365 platform. This is done by following a wizard, which is initially accessible via a web browser on the same server where Evoko Home was installed. Here, the configuration consists of using the corresponding service account we created in step 1, as well as creating new credentials for logon to Evoko Home solely.
- Configure rooms within Evoko Home
As you might have gathered, the website which Evoko Home publishes is indeed the administrative interface for managing Evoko Liso devices. During the first logon, you will able to set Global and Default room settings on how the Liso devices will operate. Thanks to the service account with the Impersonation rights, you will then be able to import room resources which the Evoko Lisos will synchronize with.
- Install Evoko Liso
The last, but certainly not the least, step is to finally connect the Evoko Liso device to the Evoko Home server! Considering that the network configuration is taken care of, it is simply to enter the Evoko Home server’s IP address and then select which room the Liso will display.
With above being fulfilled, this should conclude into the following system architecture design.

DIFFERENCES BETWEEN DEFAULT MODE AND LIMITED MODE
While my example covers the Default Mode setup, it should be known that the so called Limited Mode setup is an option as well. The latter does also support synchronization with existent collaboration platforms, but with the Evoko Home server out of the picture entirely. This means that any new configuration, such as Global settings and Room selection, must be exported from a desktop installation of Evoko Home to an USB memory. From there the configuration will have to be uploaded manually for each Evoko Liso device. See the system architecture design below for reference.

As Limited Mode implies however, it is drastically restricted regarding available functions. The main ability you will have to lose out on is remote management, which includes monitoring, statistics and handling updates automatically for each Evoko Liso device. The ability of using the built-in RFID reader will also be disabled.
Another main difference is that Limited Mode does not support the latest Evoko Liso software (v2.X). This is unfortunate as from version 2.X and onwards the Evoko Liso has really showed its true potential, in my humble opinion. Not to mention the fairly frequent updates that Evoko releases, which you will additionally miss out on pursuing Limited Mode.
If you would like to know more about Evoko Liso, feel free to reach out to me at hanessa.milaszewski@xenit.se or by leaving a comment below!
Tags : Evoko, Evoko Home, Evoko Home Server, Evoko Liso, Exchange, Google G Suite, IBM Domino, Linux, Liso, Lotus Domino, Office 365, Outlook, RFID, Room Manager, Windows
Personlig rådgivning
Vi erbjuder personlig rådgivning med författaren för 1400 SEK per timme. Anmäl ditt intresse i här så återkommer vi så snart vi kan.
Add comment